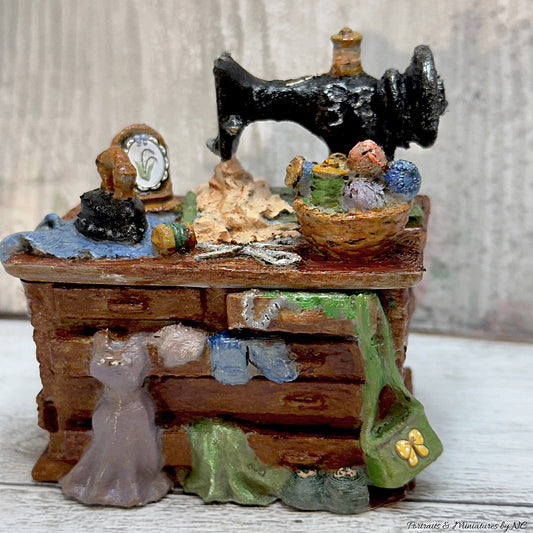
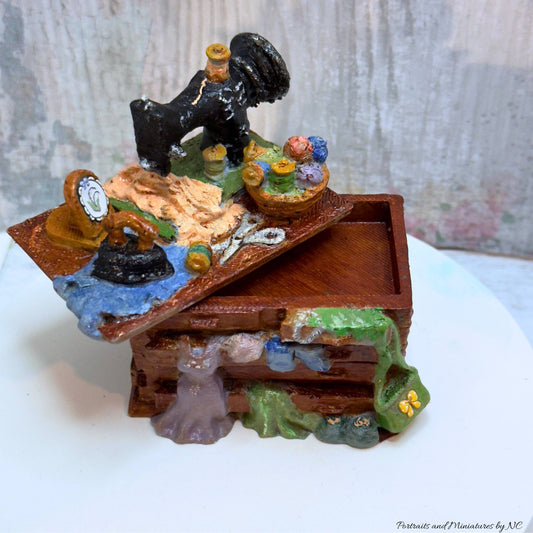
How to Make a Small Writing Desk: A Step-by-Step Tutorial

Are you looking to add a charming and functional piece of furniture to your miniature dollhouse? In this tutorial, I will guide you through the process of creating a small writing desk using foam board, a bit of contact paper and coffee stirrers. The scale we will be working with is 1/24, but don't worry, I will also show you how to enlarge the measurements to 1/12 if desired. Get ready to embark on a delightful crafting adventure!


1. Materials Required
Before we begin, let's gather all the materials you will need for this project:
- Foamboard
- Coffee stirrers, woodsticks or cardstock we need at least 0.3cm thickness
- Craft knife
- Ruler
- Pencil
- Wood glue
- Sandpaper
- Paint or stain
- Paintbrush
- Clear varnish (optional)
- Small clamps or clips (optional)

2. Step 1: Preparing the Foamboard
Start by measuring and marking the dimensions for the desk components on the foamboard. You will need to cut out the following pieces:
- Desk legs (4 pieces)
- Desk frame sides (2 pieces)
- Desk frame front and back (2 pieces)
- Desk surface (1 piece)
- if you have contact paper use enough to wrap the foam board in it
 Use a craft knife and ruler to make precise cuts along the marked lines. Take your time and ensure clean edges.

3. Step 2: Creating the Desk Legs
To give the desk stability and an elegant look, we will use coffee stirrers to make the legs. Cut the coffee stirrers to the desired length for the legs, keeping in mind the scale you are working with. You will need four equal-sized pieces.
Next, apply wood glue to the ends of each coffee stirrer leg and attach them to the bottom corners of the desk surface. Make sure they are evenly spaced and aligned. Allow the glue to dry completely.

4. Step 3: Constructing the Desk Frame
Now, let's assemble the desk frame. The desk frame is made of 2 side pieces that form a rectangle. The short end of each rectangle attaches to the foam board sides. Construct the rectangles and make sure they are of even length. Hold the pieces together firmly until the glue sets. Then attach the long bracket to the back lower part to give the sides more stability.


For added stability, you can reinforce the joints with small clamps or clips while the glue dries. Once the glue is fully cured, remove the clamps or clips.
5. Step 4: Adding the Desk Surface
Take the assembled desk frame and apply a layer of glue to the top edges. Carefully place the desk surface on top, aligning it with the frame. Press down gently to ensure a secure bond. Allow the glue to dry completely.
6. Step 5: Finishing Touches
To make your small writing desk visually appealing, you can add some finishing touches. Use sandpaper to smooth any rough edges or surfaces. You can also paint or stain the desk to your desired color. Apply multiple coats if necessary, allowing each layer to dry before applying the next. I often give the pieces an initial coat of color to make sure that hard to reach areas are covered. Then once the paint has dried, I inspect everything, sand the pieces smooth and apply a last thin coat of paint using Vallejo model paints.

If you want to protect the paint or stain and give the desk a polished look, you can apply a clear varnish. This step is optional but highly recommended for durability.
7. Enlarging the Measurements to 1/12 Scale
If you wish to create a larger version of the writing desk, you can easily scale up the measurements. Simply double the dimensions of all the components while keeping the proportions consistent. This will result in a 1/12 scale desk suitable for larger dollhouses.
Conclusion
Congratulations on completing your small writing desk! By following this tutorial, you have learned how to create a miniature furniture piece using foam board and coffee stirrers. Whether it's for your dollhouse or a unique gift, this small writing desk adds character and functionality to any miniature setting.
FAQs
-
Can I use different materials instead of foam board and coffee stirrers?
- Absolutely! Feel free to experiment with other materials like balsa wood or cardboard.
-
How long does it take to complete this project?
- The time required depends on your crafting skills and the complexity of the design. On average, it may take a few hours to complete.
-
Can I customize the desk with additional features?
- Of course! You can add drawers, a hinged lid, or even a miniature chair to complement the desk.
-
Are there any safety precautions to consider?
- When using sharp tools like craft knives, exercise caution to prevent injuries. Keep them out of reach of children.
-
Can I paint the desk in different colors?
- Absolutely! Let your creativity shine by choosing colors that match your desired aesthetic.
With this tutorial, you now have the knowledge and skills to create your own small writing desk. Have fun crafting and enjoy the satisfaction of bringing this delightful miniature piece to life!
This table is part of the furniture I am making for a commissioned dorm room diorama. I will be adding more tutorials, so make sure to subscribe.