Eye Painting Tutorial

When painting the eyes, you have to make sure that they are focused on something and have something to communicate with the viewer.
I am often told that my paintings have a soulful look to them and that's probably because for me the eyes are the most important feature of the face. As babies this is the first facial feature we focus on when we look at our parents, when we want to get someone's attention or when we look for guidance. As we get older many of us notice the mindset of another human being based on how their gaze is, sad, happy, thoughtful, sleepy, alert, etc. .
In this painting of a toddler boy you can see how the eyes have developed from mere dark points to expressive eyes.
Instruction:
Round One -
1. Place the eye roughly in using a lighter shade of the actual colors you see.
-Eyeball
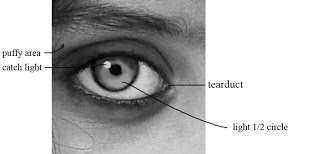
When placing the eyeball, imagine a ball that sits in the eye socket of the skull. Just like a ball, the form will be round and there will be lighter or darker areas depending on how the light hits it. The eyeball is never a pure white. It will have a pale tint of grey-blue and have some pink of the skin reflected into it. In order for the eyeball to stay put it is covered by skin, which will form the upper and lower eye lid. The skin of the lid tucks into the corner of the eye, this is also the area where the tear duct is. Just as the eyeball gets affected by the light, so will the eye lid above and below the eye.
Although there are many different shapes of eye, between the eyebrow and eyelid there will be a pronounced area that tends to puff out. This most likely will cast a shadow on the eyelid below. Where this puffy area folds over the upper eyelid will be the dark crease.
Eye Crease - Using Value 1 Venetian Red place the crease, but break up the line of the crease. See how the crease is interrupted by the skin from above? You'll have a few areas where the crease is sharper on the upper eyelid and then creases that soften out, like the one on the lower eyelid, which smoothen as it reaches the corner of the eye.
Shape of Lids - When you create the form of the eyelid over and under the eyeball remember that this is accomplished by gradual shifts in values and not sharp lines. Look out for cast shadows. By using highlight and shadows you can give the skin around the eye form. To make the lower lid portion recede darken it's value. The eye already has a distinct shape even though there is no pupil yet.
The iris and pupil sit on top of the eyeball and therefore have to receive the same shading as the eyelid. It is important to remember that the location of the iris has to coincide with the upper and lower lids. If you change the direction of the gaze you have to change the shape of the upper and lower lid as well.
a. Iris - Pick a lighter shade of brown, blue or green then you see and paint in the iris (you can darker it later). The iris is completely round and will be covered partially by the eyelid. The more of the eye is apparent the more the person will have a shocked or staring look to them. Toddlers ten to have a wide eyed look - so much to look at afterall! If you hide a lot of the eye, then the look will be one of sly or sleepy bedroom eyes.
COOL LINK Irises
b. Pupil - Use black and place the outer dark rim on both pupils. The pupil is completely round and always black. Paint in a round dark circle in the middle of the iris. In bright light (or when a flash was used) the pupil constricts and appears very small. The darker the environment the larger the pupil will be. Look for built up of excess moisture where on lower part of pupil and eye rim.
c. Cast Shadow - Place the cast shadow of the eyelid over the iris and eyeball. This makes it appear as if the pupil is connected to the eyelid.
d. Highlight - Look at your model and ask yourself at what position of the clock the highlight is (light that reflects off the iris from the light source). The highlight is painted overlapping the iris and pupil. Place the highlight with a dab of pure white in the exact location on both irises.
e. Light Area of Iris - There will be a lighter area at an 180 degree angle opposite the catch light. In brown eyes use an orange hue and place a half circle between the pupil and the iris. Now feather the dark outline of the pupil with the color of the pupil to reduce the outlined look.
3. Lower Eyelid and Rim
The bottom eyelid is not flat against the eyeball, instead it sticks out a little. To show this place a thin pinkish rim between the iris and the lower lid. Note how this rim varies in width and how it softens out as it recedes in space. Avoid sharp lines! Since it is also a moist area it catches light easily so look for lighter areas.
4. Eyelashes
When painting the lashes below the eye, don't have the sprouting out of the eyeball!
With a Dark Umber you can make a darker smudge to indicate the darkness of the lashes in the corner of the eye. Then clump a few lashes together to indicate separated lashes. The lashes of the upper lid will cast shadows on the eyeball and sometimes on the bone on the side of the face. Look at your model and see if you see any of those cast shadows. The eyelashes will also cast a shadow over parts of the iris and eyeball. I don't place lower lashes on small kids and might just indicate the presence of lashes with a bit of darker skin tone.
Round Two -
It is time to tidy up and enhance what has already been established.
Corner of the Eye - As the white of the eyeball nears the corners it will become pinker and a bit raised. It is usually an area that is moist. A tint of blue added to the eyeball color and a few highlights will do the trick. Don't overdo this!
Iris- Some have a multitude of color speck in them. To create this multitude of colors, it is best to wait until the 1st color layer is dry. The with a very tiny brush add these color shapes. This works best if you gradually built up the color layers.
Highlight on Iris - soften the edges a bit.
Folds and wrinkles - As people age they tend to get more pronounced folds around the eyelids. Look at your model, unless you are doing an extreme close-up of the face, you might consider leaving some of these out to make the sitter look a bit younger.
Focus - Depending on the view of the eyes you might consider having one eye be more dominant in the degree of finish. Take a good look at your model/reference and ask yourself to which eye you are drawn more. That would be the one that's the attention grabber. Also make sure that certain areas of the eye are in less focus as to give the appearance of receding in space.
Tear Duct - see if it catches any light and indicate it. Don't forget the tiny pink membrane between the tear duct and eyeball.
Remember:
-deep set eyes - use deeper values
-Eyebrows
Before you actually put in the eyebrows start by thinking about the skull. Above the eye socket the bone starts to gradually extend out creating the brow line. It is best to paint this area first with skin color. Once dry to the touch look at the model and determine the look. A surprised individual will have raised eyebrows, an angry one eyebrows that converge. The muscle action below the skin will determine the angle of the eyebrows.It creates the shape of the lower forehead and temples. Only a few hairs will be sufficient.
Great Links
-Ancient Eye Placement
-Ocular Dominance