Wash In

The wash in is an easy way for the artist to quickly establish the composition, the initial drawing and determine the value structure.
Supplies:
1. Cold Pressed Lindseed Oil Gamblin or Winsor & Newton
2. Raw Umber (Windsor & Newton is a drier Raw Umber brand)
3. 50/50 Medium
4. Clove Oil
5. Eye dropper
6. Palette Knife
7. Beveled edge 2inch Varnish Brush (available at any hardware store)
8. Tortillon
MIXING INSTRUCTIONS:
1. On a flat surface squeeze out about 4 inches of Raw Umber
2. Add 2 drops 50/50 Medium - be exact!
3. Add 1 drop clove oil in warmer climates ( a bit less in colder climates)
Raw Umber is a fast drying pigment adding the clove oil will allow the paint to stay workable for a longer time. If the painting does not dry within 24 hrs consider using less oil next time.
4. Mix everything with you palette knife
5. T-Shirt rag
Before you start the wash in
APPLICATION:
1. Squint and locate the darkest shadow value on your model or reference photo.
2. Using the Varnish Brush, place some paint in one corner of the canvas and until it corresponds with the shadow value you observed.

3. DO RUB TEST! Using a clean T-shirt rag wrapped around a finger wipe down to the surface of the canvas. The idea here is to get a nice gradation from your darkest value to the lightest (lightest surface of canvas).
Note: if you are unable to achieve a smooth gradation, then you have either used too much oil in your paint mix or too little. Wipe of your swatch and remix you paint again adjusting accordingly.
4. Now apply the paint to the entire canvas moving from left to right and then up and down. The aim is to match the original swatch in the corner and create a smoothly paint covered surface. Your last paint application should be with downward strokes to eliminate canvas glare.
Your Wash in is now ready to receive the 1st sketch.

(I tend to bypass this step when working from photos, but it should be followed when working from a model)
- Using a tortillon mark off 2 in from the top.
- Use a compositional frame to locate the desired placement of your model on the canvas.
- When working from model use
to determine head size
- Work from the outside inward
- Draw the head using only STRAIGHT LINES. The idea is to create only shapes and how they relate to each other! To determine correctness of shapes look at the relationship between the smaller shapes vs larger ones and the relationship between negative and positive space.
-Place brows, eyes, nose, mouth
-Place pupils by looking at the shape of the eyeball
-Shape of muzzle defines shape of nose
-Define light and shadow by their shapes
New Supplies:
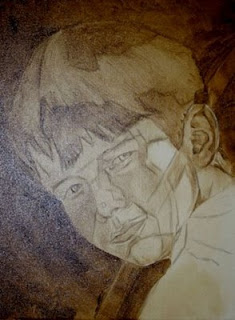
-Wash in Completed
I was taught to make the wash in look like a very abstract painting. Looking strictly for light and dark areas. I work like this when working from the life model, but not when working from photographs. This technique is a wonderful simplification and especially recommended for the beginner. Since I have drawn the painting with a ink pen, I develop the painting keeping these steps in mind.
As the painting developed further, the solidity of the head developed further as well. There are still some areas that could be better, but further refinements will be addressed in the gray grizaille layer.
The Wash in is a wonderful time to think about what works and what doesn't. Not too mucch time has gone into painting and errors or modification can easily made. Here I decided to take out the stick and do away with the shadow on the cheek. That element did nothing to enhance the painting and was an unnecessary distraction. Before moving further ahead this layer has to completely dry to the touch, so that the Umber does not mix with the next layer.

I will be adding more tutorials as I go about painting the portrait and will add a slide show where you can follow it's creation from start to finish. Make sure to sign up for "Follow this blog" or Email notification if you want to work along.